javaで書いたサンプルコードです。 実行ディレクトリに「CircleRenderTest.png」という画像ファイルを出力します。 フレームは使っていません。
// CircleRenderTest.java
import java.io.File;
import javax.imageio.ImageIO;
import java.awt.Color;
import java.awt.Graphics;
import java.awt.image.BufferedImage;
import java.awt.image.WritableRaster;

public class CircleRenderTest
{
    public static final int IMAGE_SIZE = 420;
    public static final String FILE_NAME = "CircleRenderTest.png";

    public static final int ALPHA_MAX  = 255;
    public static final int RADIUS_MAX = 200;

    private int [][] _D;

    private BufferedImage _img;

    public void initD()
    {
        _D = new int[RADIUS_MAX + 1][];

        _D[0] = new int[1];
        _D[0][0] = 0;
        for(int r = 1; r <= RADIUS_MAX; r++)
        {
            int y_max = (int)(Math.ceil( (double)r / Math.sqrt(2.0) ) );
            _D[r] = new int[y_max + 1];

            for(int y = 0; y <= y_max; y++)
            {
                double x = Math.sqrt(r * r - y * y);
                _D[r][y] = (int)(ALPHA_MAX * (Math.ceil(x) - x) );
            }
        }
    }

    public void drawCircle(int cx, int cy, int r, int color)
    {
        int[] Dr = _D[r];

        int x = r;
        int y = 0;
        int d = 0;
        int d_old = 0;

        // 軸上の点は4wayでいいんだけど、手抜き
        setPixel8way(cx, cy, x, y, color, ALPHA_MAX);

        while(y < x - 1) // 内側のピクセルと45度の線を比べる
        {
            y++;
            d = Dr[y];

            if(d < d_old)
            {
                x--;
            }

            setPixel8way(cx, cy, x    , y, color, ALPHA_MAX - d); // 外側のピクセル
            setPixel8way(cx, cy, x - 1, y, color, d);             // 内側のピクセル
            d_old = d;
        }
    }

    public void setPixel8way(int cx, int cy, int x, int y, int color, int alpha)
    {
        int rgba = alpha << 24 | color;
        _img.setRGB(cx + x, cy + y, rgba);
        _img.setRGB(cx + x, cy - y, rgba);
        _img.setRGB(cx - x, cy + y, rgba);
        _img.setRGB(cx - x, cy - y, rgba);
        _img.setRGB(cx + y, cy + x, rgba);
        _img.setRGB(cx + y, cy - x, rgba);
        _img.setRGB(cx - y, cy + x, rgba);
        _img.setRGB(cx - y, cy - x, rgba);
    }

    public void run()
    {
        _img = new BufferedImage(IMAGE_SIZE, IMAGE_SIZE, BufferedImage.TYPE_INT_ARGB);
        Graphics g = _img.createGraphics();

        initD();
        int color = 0;
        for(int r = 0; r <= RADIUS_MAX; r += 10)
        {
            drawCircle(
                IMAGE_SIZE / 2,
                IMAGE_SIZE / 2,
                r,
                calcColor(color++) );
        }

        try
        {
            ImageIO.write(_img, "png", new File(FILE_NAME) );
        }
        catch(Exception exc)
        {
            exc.printStackTrace();
        }
    }

    public int calcColor(int r)
    {
        int rgb = (r % 6) + 1;
        return
            ( (rgb & 0x4) > 0 ? 0xff0000 : 0) |
            ( (rgb & 0x2) > 0 ? 0x00ff00 : 0) |
            ( (rgb & 0x1) > 0 ? 0x0000ff : 0);
    }

    public static void main(String[] args)
    {
        CircleRenderTest thisApp = new CircleRenderTest();
        thisApp.run();
    }
}
実行結果はこんな感じ。
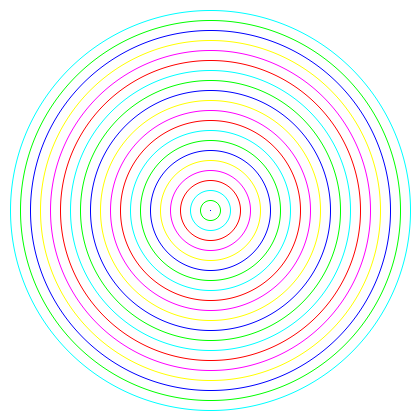
実行結果の画像を保存してペイントソフトなどで拡大すると、アンチエイリアスがかかっているのが確認できます。 ただし、WindowsXPのMSペイントはアルファ値に対応していないらしく、アンチエイリアスが確認できません。 (以降のMSペイントはどうなんでしょう?) 適当なペイントソフトを用意して見てください。
サンプルコードはコピー&ペースト可です。 しかし、いくつか注意点があります。
コピー&ペーストしてコーディングする場合は、↑の項目を各自で改良して使ってください。 それと、次の項目に書いた課題も参照。